G'day All,
I thought that I'd share my latest upgrade to the Levorg.
I'd already upgraded the factory boot light from the terrible halogen to an LED bulb, however, I still felt that it wasn't enough.
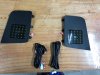
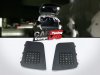
Initially, my plan was to fit 2 LED downlights in the tailgate, that was until I came across these on eBay;
https://www.ebay.com.au/itm/Rear-Trunk-Boot-LED-Super-Bright-lights-Lamps-For-2014-up-Subaru-LEVORG-1-6T-2-0/362249207376?ssPageName=STRK:MEBIDX:IT&_trksid=p2060353.m2749.l2649
I was skeptical at first, 60 odd Aussie for a purpose made panel with LED's inbuilt and a wiring loom.....sounds too cheap to be any good, right?
Well, I'm happy to report that I was wrong, it's a pretty bloody good product.
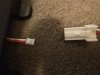
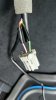
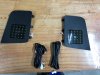
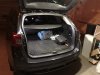
Install took around 1-2 hours, as I removed all the tailgate lining along with part of the passenger side boot lining so that I could wire these lights into boot light.
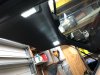
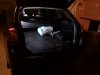
Here's some before and after photos
I thought that I'd share my latest upgrade to the Levorg.
I'd already upgraded the factory boot light from the terrible halogen to an LED bulb, however, I still felt that it wasn't enough.
Initially, my plan was to fit 2 LED downlights in the tailgate, that was until I came across these on eBay;
https://www.ebay.com.au/itm/Rear-Trunk-Boot-LED-Super-Bright-lights-Lamps-For-2014-up-Subaru-LEVORG-1-6T-2-0/362249207376?ssPageName=STRK:MEBIDX:IT&_trksid=p2060353.m2749.l2649
I was skeptical at first, 60 odd Aussie for a purpose made panel with LED's inbuilt and a wiring loom.....sounds too cheap to be any good, right?
Well, I'm happy to report that I was wrong, it's a pretty bloody good product.
Install took around 1-2 hours, as I removed all the tailgate lining along with part of the passenger side boot lining so that I could wire these lights into boot light.
Here's some before and after photos
Attachments
-
 125.5 KB Views: 187
 -
 763 KB Views: 189
 -
 2.5 MB Views: 199
 -
 1 MB Views: 186
 -
 2.3 MB Views: 193
Last edited:
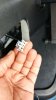
") ). then just connect the wires up to the boot light and you're done.
). then just connect the wires up to the boot light and you're done.