I have a friend based in Japan, got them direct from HKSInteresting, what were the price/s on the HKS items? And where from?
They weren't too bad, I think was $1200 ish shipping was close to $300 though
Last edited:
I have a friend based in Japan, got them direct from HKSInteresting, what were the price/s on the HKS items? And where from?
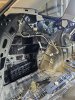
Hey mate, I've found this STI under spoiler on FB Market place but pretty sure its a sedan one. Do you know if there was a difference from when you were finding yours?Next up was the exhaust. I have early starts (4.30AM) and live in a relatively quiet neighbourhood so goal here was to have something that had a nice tone but didn't lower eyebrows.
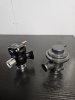
I opted to try out an STi system since these OEM exhausts are a dime-a-dozen on Facebook marketplace here in NZ:


Of course, the rear STi tips would not fit under the factory bumper (and important to note here: they also don't extend out anywhere near as far as the single-tip Levorg one does).
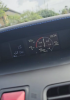
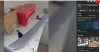
Cue the "Quattlo Muffler Garnish" from Shining Speed Japan and a bit of work with the angle grinder and dremel:


Now, these garnishes are originally designed to go together with a "single to dual", sleeved exhaust tip conversion which is unfortunately discontinued and I was wanting to use the STi tips anyway for the extra sound, so end result meant that the tips sit a little inside the rear bumper since the OEM tips are non-adjustable.
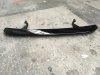
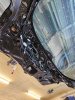
I also scored a genuine STi Levorg rear diffuser so that went on at same time:


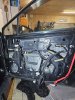
Back under we go with the angle grinder:

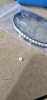
The chrome tips come off nicely, as they are only spot welded in a couple of places, leaving a metal sleeve which will later house a clamp-on style exhaust tip (4x) from AliExpress:


I took sound clips with a few variations of the exhaust :
- OEM Levorg midpipe / Levorg tailpipes (The levorg as we all know it, quiet)
- STi midpipe / Levorg tailpipes (Extremely mild increase in exhaust note, barely noticable)
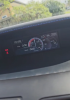
- STi midpipe / STi tailpipes (Marginal increase in sound, however brings a very annoying "booming" drone from 1,200-1,500 RPM with the CVT transmission, purely because the pipes sit right under the rear bumper (EDIT: Confirmed after removing stock tip garnishes and replacing with longer ones above: 30/11/23)
I believe the drone is partly to do with the fact the tail pipes are currently 50-60mm short of where they should ideally be on the bumper.
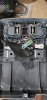
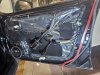
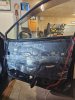
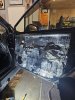
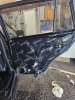
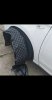
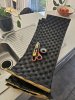
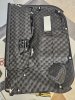
But also the rear sound-deadening in the Levorg is awful. A trip to Jaycar saw me with some butyl, foam and mass loaded vinyl to help reduce some of this drone coming into the cabin. A work-in-progress pic:

This is currently where I've left things. The two side, flat panels just with butyl have helped TREMENDOUSLY. If you remove your rear trim and give these a tap (I have a video of mine) you will notice how these sound like the side of a tin shed. Why Subaru left these un-deadened is beyond me.
I will get back in soon and update this post with the foam added and finally the mass-loaded vinyl over top.
Of course, once the exhaust tips arrive from AliExpress and move the exit back another 50mm, this will also help.
Looks the same as the one that was on my car when I got it:Hey mate, I've found this STI under spoiler on FB Market place but pretty sure its a sedan one. Do you know if there was a difference from when you were finding yours?
I couldn't tell you sorry mate. I had a friend who had a written off Levorg come across their yard with some goodies so I had the privilege of getting first dibs on a few aero pieces.Hey mate, I've found this STI under spoiler on FB Market place but pretty sure its a sedan one. Do you know if there was a difference from when you were finding yours?


Nice I've been toying with the mfd upgrade but couldn't find any sellers of the harness when you make yours be sure to take plenty of photos
Where did you get 2018 unit from?
Good luck with the guage cluster looks like a pita. Do you know if you get a replacement unit, if it reads the milage from ecu or is it stored in the guage cluster?
Cheers


Hey Supafly_NZ. bought both the harness and the MFD thanks againIf you're interested in the MFD upgrade there is another one that popped up cheap here ($296 NZD) :
Info-GPS-TV Screen Fits 18 WRX 2907749 | eBay
Find many great new & used options and get the best deals for Info-GPS-TV Screen Fits 18 WRX 2907749 at the best online prices at eBay! Free shipping for many products!www.ebay.com
Then it's a simple case of buying this connector:
Subaru Adaptor Cables To Swap 2018+ 5.9" MFD of WRX To Pre2018 WRX, Forester .. | eBay
Find many great new & used options and get the best deals for Subaru Adaptor Cables To Swap 2018+ 5.9" MFD of WRX To Pre2018 WRX, Forester .. at the best online prices at eBay! Free shipping for many products!www.ebay.com
Job done
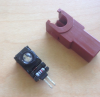
And the mileage is stored in the cluster itself, so the EEPROM unit needs to either come across (or be cloned by read/write) using a tool.
I may investigate the tool method if I can source an EEPROM clamp and a serial to usb adapter for cheap, otherwise I'm pretty handy with a soldering iron. Either method involves carefully removing the needles though and this is the hard part, rubber gloves and a swift movement are key.
looks like its a 93C76 EEPROMNice work grabbing the parts. I've decided to grab the harness also to save some time.Hey Supafly_NZ. bought both the harness and the MFD thanks again
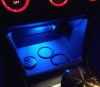
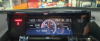
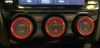
After reading your post you've made me look at all the blue lights now and i cant unsee haha, I have the red ring climate controls which is handy
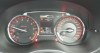
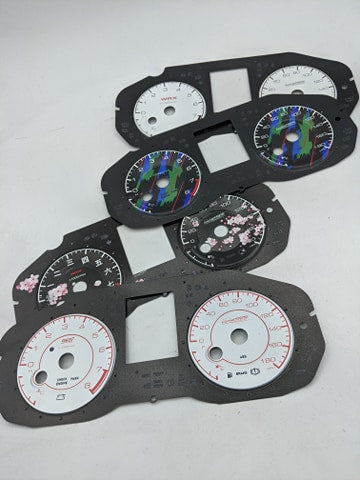
I have been able to find some STI speedos on beforward
https://autoparts.beforward.jp/detail/Electrical-Parts/Speedometers/PA87032320/?buynow=1
I'm not that good with a soldering iron,do you think you could swap the entire circuit board from GTS speedo to STI ? or am i dreaming... \
Update : looks like the circuit board is actually the lights needles and everything so not really easy swap...maybe we can go halves in a EEPROM clamp that might work ?
hmm this might be outta my league
Subaru WRX STI 2015 Odometer
:hypnotysed: Hi DK,i need help for odometer correction i need adjust milage to 122487km after cluster swap i need pinout from back of cluster i can broke motor shaft if remove needles i found pictures on DK so 6 wires blue,red,black,orange,brown and yellow not know what tool use with picture so...www.digital-kaos.co.uk


 www.illumaesthetic.com
Nice work grabbing the parts. I've decided to grab the harness also to save some time.
I'll try swapping the cluster once it arrives with no other changes and see what error codes I get in the car. Obviously odometer will be out but I'm interested to see what happens with immobilizer as I was told it wasn't an issue.
There are a few local guys who have done the swap already so I'll reach out and see what else was required.
I think an Eeprom clamp from AliExpress is cheap enough so I may do that also.
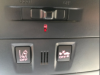
Here is the before and after for the AC controls. I had already done the cubby LED:
View attachment 2317View attachment 2318