Parian
Active Member
Hi all
Finally!!!...after near on 3 months, stage 1 has been completed of the 'WOO's' transformation.
Cash saved on negotiating a fair price for the GT model has been funneled back into personalizing her.
Here's the scope thus far...
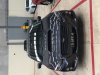
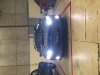
1. Chrome delete on lower window trim using 3M 12mm black pinstripe.
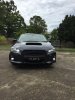
2. Replaced front under grille with Corazon front under grille and 3M matte black vinyl wrapped.
3. Replaced front upper grille with Corazon front grille type S FRP, 3M matte black vinyl wrapped outer section, painted inside section to match car colour. At this stage i ran with the Corazon badge painted to match car colour.
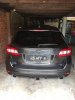
4. Replaced tail lights with Corazon Led tail lamp black bezel.
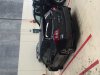
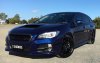
5. Chrome deleted tail end strip above number plate with 3M matte black vinyl.
6. Chrome deleted the accessory liner with 3M matte black vinyl.
7. De-badged tail end of Levorg and AWD.
8. Replaced the stock silver Enkei rims with Corazon wheel matte black type.
9. Used Corazon titanium iridescent lug nuts to secure said rims.
10. Replaced the govt. standard issue maroon number plates to slim line black & white number plates.
Note: To me it was alot cheaper than buying personalized number plates.
11. MCA suspension X-c series
One could say it's a Corazon Levorg now. I'm quite pleased in how she turned out
Will post results of stage 2, when ever that occurs
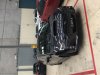
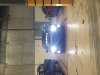
 Early Daze 'WOO'
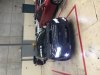
 Front 'WOO' stage 1.
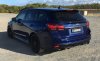 Rear 'WOO' stage 1.
Finally!!!...after near on 3 months, stage 1 has been completed of the 'WOO's' transformation.
Cash saved on negotiating a fair price for the GT model has been funneled back into personalizing her.
Here's the scope thus far...
1. Chrome delete on lower window trim using 3M 12mm black pinstripe.
2. Replaced front under grille with Corazon front under grille and 3M matte black vinyl wrapped.
3. Replaced front upper grille with Corazon front grille type S FRP, 3M matte black vinyl wrapped outer section, painted inside section to match car colour. At this stage i ran with the Corazon badge painted to match car colour.
4. Replaced tail lights with Corazon Led tail lamp black bezel.
5. Chrome deleted tail end strip above number plate with 3M matte black vinyl.
6. Chrome deleted the accessory liner with 3M matte black vinyl.
7. De-badged tail end of Levorg and AWD.
8. Replaced the stock silver Enkei rims with Corazon wheel matte black type.
9. Used Corazon titanium iridescent lug nuts to secure said rims.
10. Replaced the govt. standard issue maroon number plates to slim line black & white number plates.
Note: To me it was alot cheaper than buying personalized number plates.
11. MCA suspension X-c series
One could say it's a Corazon Levorg now. I'm quite pleased in how she turned out
Will post results of stage 2, when ever that occurs
Early Daze 'WOO' Front 'WOO' stage 1. Rear 'WOO' stage 1.
Last edited: